 Concept: Lighting accessories
This overview describes how accessories work in Spotlight, so you can understand the capabilities and know where to find more specific information.
Adding accessories to lighting devices
You can attach accessory symbols to lighting device symbols to modify the devices’ hanging position or lighting behavior.
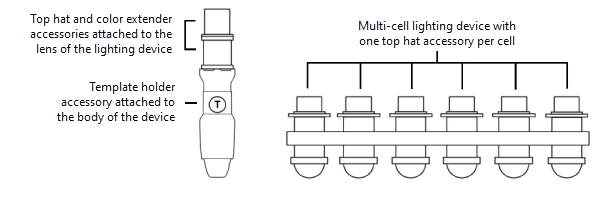
A lighting device, whether a single-cell or multi-cell, can have accessories in different locations. It can also have multiple accessories in the same location, typically the lens.
Top/Plan view
Attaching accessories
There are two ways to add accessories to lighting devices:
The Lighting Accessory tool inserts accessories on existing lighting devices. The tool has different capabilities depending on the context. In the drawing area, the tool places accessories in the default position. In accessory edit mode, the tool also allows custom positioning. Use accessory edit mode to modify all the accessories on a single lighting device or to modify the same accessory on multiple devices. See Accessory edit mode for more information.
Advanced users who create custom lighting device symbols can add accessories directly to the symbol definition. This allows the lighting device to be inserted with the accessories already attached. See Workflow: Creating lighting device symbol definitions for more information.
Once an accessory is added, it becomes part of the lighting device geometry. As you move and focus the device, its accessories move and rotate with it.
Default accessory positions
Each accessory is assigned to a part of the lighting device: the lens, body, yoke, or base. This determines the accessory's default position:
Lens accessories attach to the front of the device in 2D and 3D views.
Body accessories attach to the middle of the device (one-third of the way between the front and back) in 2D views. They attach at the center of rotation in 3D views.
Yoke accessories attach at the device insertion point in 2D views. They attach at the center of rotation in 3D views.
Base accessories attach to the base of the device and alter its insertion point in 2D and 3D views. See Attaching base accessories for details.
The accessory symbols from the Spotlight libraries already have the correct part association. If the accessory you need is not available, and you're an advanced user, you can create a custom accessory symbol definition and attach the Parts record to define the correct part; see Workflow: Creating accessory symbol definitions for more information.
Attaching base accessories
When a clamp—or any base accessory—is attached to a lighting device, the device insertion point changes automatically to accommodate the base. This allows the lighting device to auto-position correctly (when auto positioning is enabled on the Spotlight preferences: Loads and Rigging pane) and to participate in structural calculations with Braceworks. If there are multiple base accessories, the last accessory in the stacking order sets the lighting device insertion point.
If you are creating a clamp symbol definition or adding a clamp directly to a lighting device symbol definition, attach the Parts record to the symbol definition to define the clamp as a Base part; see Attaching the Parts record to the accessory.
Setting accessory parameters
Each accessory has an index number that displays in the Object Info palette, the Lighting Device dialog box, and the Patch dialog box. The index number is determined by the stacking order: accessory #1 is the first created accessory in the default stacking order, or the accessory that is the farthest “back” in a custom stacking order.

Accessories have many of the same parameters as their associated lighting device. Some accessory parameters are controlled by the lighting device, while others can be set independently. The Lighting Device Parameters list in the Spotlight preferences: Lighting Devices: Parameters pane indicates which parameters can be set specifically for accessories.
You can set the accessory parameters in two places:
The lighting device Object Info palette displays the parameters shared by the lighting device and its accessories. Select the accessory to edit (or select all accessories for editing) from the Edit Accessory list, and set the parameters as described in Lighting device properties.
The accessory Object Info palette, which is available only in accessory edit mode, displays additional parameters for fine-tuning the accessory’s location and rotation. Set the parameters as described in Adjusting accessories.
See Managing accessories for more information about inserting, editing, and deleting accessories.
